今天我们来谈谈个人服务器的简单优化,虽然说是简单优化,其实操作内容也是比较多的,为什么说是简单呢,是因为感觉个人能力有限,达不到大神级的人物,所以只能说自己的优化是简单的。因为我的个人博客使用的是WordPress,所以就以它为例进行优化,当然也不仅仅是WordPress有效,对所有的服务器都是有效的。我会从几方面进行优化,如WordPress的优化、PHP缓存优化等。
一、WordPress优化
如果你使用的是其它软件或系统,请略过此部分,直接进入第二部分。
针对于个人博客系统而言,WordPress已经比较成熟,本身系统优化无需做太多处理,只是根据个人安装平台的习惯,可能漏掉好多安全性操作,所以接下来就会介绍到。
1.1 URL静态化设置
先说一下URL网站静态化的好处:
-
让别人判断不出你用什么语言写的网站,这样一来安全性更高一些,而对网站而言,静态化相对来说不容易被黑(注意是相对的哟!);
-
静态化可以提高网站的响应速度,因为动态网站在访问时,需要多次调用数据库,只要有读写,那速度一定会有影响,所以静态化可以降低对数据库的读写,从而加快网站的响应速度;
-
静态化减少你对数据库的读写,也会影响别外一个参数,就是你网站的并发量,相对来说会有更高的并发响应;
-
更得于SEO,我们的博客是要给大家看的,如果百度靠前是我们希望的,所以静态化有利于搜索引擎对我们网站的抓取;
-
其它好处想到了再补进来……
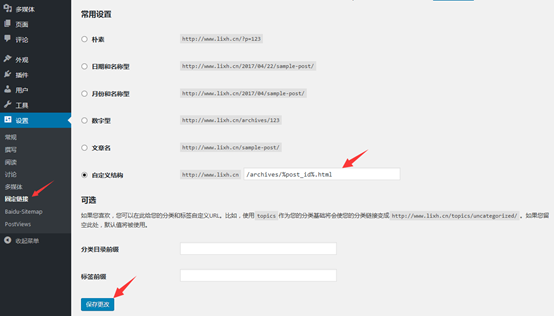
好处讲完了,开始操作吧,打开WordPress后台,点击”设置”->”固定链接”,选择自定义结构,输入格式化信息”/archives/%post_id%.html”(如果记不住怎么写,可以点击”数字型”,在从后面补上”.html”即可),点击”保存更改”按钮。
在WordPress后台配置完成后,还需要对Nginx的配置文件进行修改,Nginx默认配置文件路径为”/etc/nginx/conf.d/default.conf”,接下来要对”location /”域加入如下代码:
| location / { if (-f $request_filename/index.html) { rewrite (.*) $1/index.html break; } if (-f $request_filename/index.php) { rewrite (.*) $1/index.php; } if (!-f $request_filename) { rewrite (.*) /index.php; } } |
整个配置文件截图如下所示。
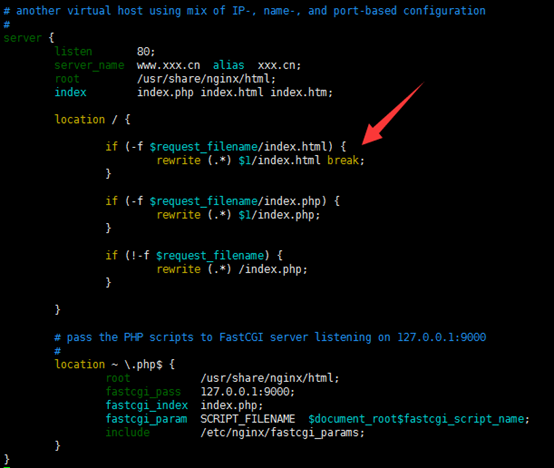
接下来,重新启动服务即可。
1.2 WordPress目录安全设置
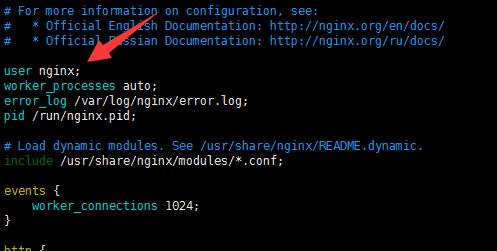
我们先来看一下配置文件(全路径为”/etc/nginx/nginx.conf”):

你可以看到这样一句话”user nginx”,这句话的意思是你所设置的网站,以”nginx”用户进行访问与管理,也就是说,当你打开浏览器访问你的网站时,就相当于用nginx这个用户访问你的网站数据信息,所以建议网站的访问用户可以使用nginx。接下来设置网站目录的访问用户并设置相应的权限(假设我们的站点目录在”/usr/share/nginx/html”下)。
# chown -R nginx.nginx /usr/share/nginx/html
# chmod -R 755 /usr/share/nginx/html
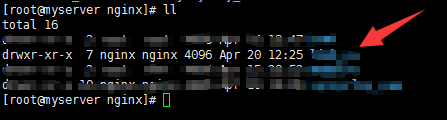
设置完成后就可以看到权限与用户了控制信息了(为了保证安全,部分信息已经进行了处理,请见谅)。
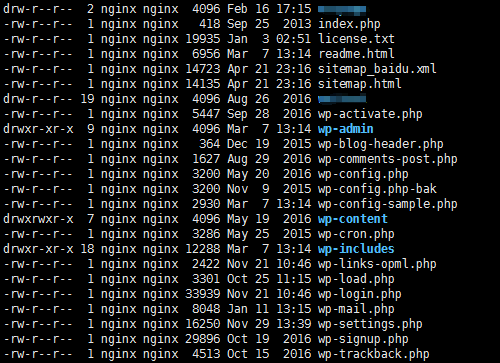
同时还需要将WordPress目录下所有文件设置为644权限,单独设置部分目录为775权限,操作如下:
# chmod -R 644 /usr/share/nginx/html/*
# chmod -R 775 /usr/share/nginx/html/wp-content
# chmod -R 755 /usr/share/nginx/html/wp-indcludes
# chmod -R 755 /usr/share/nginx/html/wp-admin
二、PHP缓存加速优化
PHP缓存优化插件有很多,我们这里使用XCache,需要大家注意的是,缓存优化插件虽多,但只要安装一个即可,不然的话,就会出现冲突等问题。接下来就是XCache的安装配置过程讲解。
2.1 XCache的安装
# mkdir /home/tools
# cd /home/tools
# wget http://xcache.lighttpd.net/pub/Releases/3.2.0/xcache-3.2.0.tar.gz
# tar -zxvf xcache-3.2.0.tar.gz
# cd xcache-3.2.0
上面的代码是下载并解压XCache,在编译安装之前,我们要找到”phpize”文件在我们机器上的位置,由于不同版本位置可能所以差异,所以需要我们进行查找。这一步很重要,因为查找到位置之后要执行一下才行。
# find / -name ” php-phpize ”
# /usr/bin/phpize
# ./configure –enable-xcache –with-php-config=/usr/bin/php-config
# make
# make install
2.2 XCache的配置
在XCache安装目录下,有一个”XCache.ini”的文件,此文件为XCache的配置模板,我们要把里面所有的内容复制到”php.ini”文件的最后,并做好相应的配置,配置信息如下所示。
| ;————————————————————————————— ; added by lixh for 2017-04-16. ; xcache config ;; this is an example, it won’t work unless properly configured into php.ini [xcache-common] ;; non-Windows example: extension = xcache.so ;; Windows example: ; extension = php_xcache.dll [xcache.admin] xcache.admin.enable_auth = On ; use http://xcache.lighttpd.net/demo/cacher/mkpassword.php to generate your encrypted password xcache.admin.user = “mOo” xcache.admin.pass = “md5 encrypted password” [xcache] ; ini only settings, all the values here is default unless explained ; select low level shm implemenation xcache.shm_scheme = “mmap” ; to disable: xcache.size=0 ; to enable : xcache.size=64M etc (any size > 0) and your system mmap allows xcache.size = 256M ; set to cpu count (cat /proc/cpuinfo |grep -c processor) xcache.count = 1 ; just a hash hints, you can always store count(items) > slots xcache.slots = 8K ; ttl of the cache item, 0=forever xcache.ttl = 86400 ; interval of gc scanning expired items, 0=no scan, other values is in seconds xcache.gc_interval = 3600 ; same as aboves but for variable cache xcache.var_size = 64M xcache.var_count = 1 xcache.var_slots = 8K ; default value for $ttl parameter of xcache_*() functions xcache.var_ttl = 0 ; hard limit ttl that cannot be exceed by xcache_*() functions. 0=unlimited xcache.var_maxttl = 0 xcache.var_gc_interval = 300 ; mode:0, const string specified by xcache.var_namespace ; mode:1, $_SERVER[xcache.var_namespace] ; mode:2, uid or gid (specified by xcache.var_namespace) xcache.var_namespace_mode = 0 xcache.var_namespace = “” ; N/A for /dev/zero xcache.readonly_protection = Off ; for *nix, xcache.mmap_path is a file path, not directory. (auto create/overwrite) ; Use something like “/tmp/xcache” instead of “/dev/*” if you want to turn on ReadonlyProtection ; different process group of php won’t share the same /tmp/xcache ; for win32, xcache.mmap_path=anonymous map name, not file path xcache.mmap_path = “/dev/zero” ; Useful when XCache crash. leave it blank(disabled) or “/tmp/phpcore/” (writable by php) xcache.coredump_directory = “” ; Windows only. leave it as 0 (default) until you’re told by XCache dev xcache.coredump_type = 0 ; disable cache after crash xcache.disable_on_crash = Off ; enable experimental documented features for each release if available xcache.experimental = Off ; per request settings. can ini_set, .htaccess etc xcache.cacher = On xcache.stat = On xcache.optimizer = Off [xcache.coverager] ; enabling this feature will impact performance ; enabled only if xcache.coverager == On && xcache.coveragedump_directory == “non-empty-value” ; per request settings. can ini_set, .htaccess etc ; enable coverage data collecting and xcache_coverager_start/stop/get/clean() functions xcache.coverager = Off xcache.coverager_autostart = On ; set in php ini file only ; make sure it’s readable (open_basedir is checked) by coverage viewer script xcache.coveragedump_directory = “” |
# vi /etc/php.ini
复制XCache.ini文件的内容到最后,并更改参数,更改完成后保存退出。
# service php-fpm restart
2.3 Memcached、PDO_MYSQL扩展模块的配置
如果你使用的是YUM在线安装的PHP,并且已经安装了必要的插件(php-pdo 与php-pecl-memcache),那么Memcached及PDO_MYSQL就已经默认安装了,我们再把安装配置过程从新梳理一下。
# yum install php-pdo php-pecl-memcache –y
如果想编译安装最新的版本,可自行下载并安装,安装方法与XCache基本相同,这里就不过多描述了。
如果在线YUM安装,就会在”/usr/lib64/php/modules”目录下看到”memcache.so”与”pdo_mysql.so”文件(系统版本不同,可能路径有所差异,可以使用find命令来进行查找)。
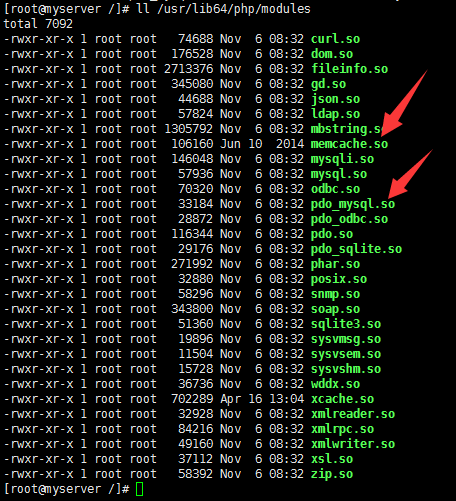
由于”/usr/lib64/php/modules”为系统目录,环境变量系统默认引用,所以为我们解决了很多配置麻烦,接下来只要在”php.ini”配置文件最后加入如下几行即可。
# vi /etc/php.ini
| ; Added by lixh for 2017-04-22. ; memcache pdo_mysql extension = memcache.so extension = pdo_mysql.so |
还需要对Nginx的配置文件进行修改,加入FastCGI的支持。
# vi /etc/nginx/conf.d/default.conf
| # pass the PHP scripts to FastCGI server listening on 127.0.0.1:9000 # location ~ \.php$ { root /usr/share/nginx/lixh_cn; fastcgi_pass 127.0.0.1:9000; fastcgi_index index.php; fastcgi_param SCRIPT_FILENAME $document_root$fastcgi_script_name; include /etc/nginx/fastcgi_params; } |
至此,服务优化已经完成。写文章太累人了~~~